home recipe index ingredient index contact
Showing posts with label appetizers and snacks. Show all posts

Friday, September 10, 2010

Stove-top Popcorn

First off, if you thought that this recipe is popcorn with a box of Stove-Top Stuffing in it, you are out of luck. You know me better than that.


Since Jack is in morning kindergarten, we don't really have an after-school snack thing. We have afternoon-bored snacks. Sometimes I really fear the hours of about 3-6pm. It's when Van has woken up from his nap, Jack is hot and tired and I am losing steam. I am sure you have no idea what I am talking about, right?

When we have an off day like that, I make popcorn and lay out a big blanket on the floor, but with full knowledge I will be vacuuming later. The popcorn seems to recharge all of us. It occupies them while I can work on dinner or pack up the diaper bag for a quick trip to the park.

So why make popcorn on the stove and not just use a pack of microwave popcorn? Well, a couple of reasons. With homemade popcorn, you can control the amount of butter and salt. And you don't get that film on the roof of your mouth from the artificial flavorings in microwave popcorn. Also, some funky chemicals have been used in microwave popcorn. Chemicals that have given employees a certain type of lung disease. ConAgra, who makes most of the microwave popcorn, has stopped using that chemical, but not all other companies have followed suit.

Above all, making your own popcorn is MUCH cheaper than buying the microwave packs. For less than the price of a box of 3 microwave popcorn packs, you can buy a bag of popcorn and get 28 batches out of it. Yes, 28. You just can't beat that.


3 Tbsp vegetable oil
1/4 cup popcorn kernels
3 Tbsp butter, melted
Salt to taste

In a large pot over medium high heat, add the oil and one popcorn kernel. Once the kernel pops, add the remaining kernels and immediately cover the pan. Using both hands, shake the pot almost constantly until you don't hear any more popping, about 2 minutes. Remove pan from heat and pour popcorn into a large bowl. Drizzle the melted butter over the popcorn and season with salt.

Rookie's Notes
: If you are looking for a homemade microwave popcorn, my gal Sweet Pea has a great method. Click here.

Also, next week, look for a recipe for chocolate caramel popcorn with peanuts and toffee bits. It's sure to please.

Thursday, August 26, 2010

Deep-fried Green Beans with Basil Aioli

Text message series:

Kalli: I have mass green beans. You interested?

Me:
Yes. I will call you in a bit.

Kalli: Sweet. I am picking them right now.

So I called her and claimed my green beans. She told me she had just picked them. How? I do not know. She was 36 weeks pregnant at the time. Bending over and picking green beans sounds nearly impossible. When I told her I was coming, I also mentioned that I was bringing her a big slice of chocolate cake with peanut butter frosting. And she said with a sigh, "Let's get married." I suppose that chocolate cake is that satisfying at 36 weeks pregnant. Kal, does your husband know you just proposed to me?


For the aioli
:
2 garlic cloves
1 egg yolk
2 tsp lemon juice
1/2 tsp dijon mustard
10 basil leaves
1/3 cup olive oil

In the bowl of a food processor, add the garlic cloves and process until minced. Add egg yolk, lemon juice, mustard and basil. Process and add olive oil very slowly, drop by drop, until the aioli is emulsified and thick and smooth. Transfer to a small bowl and refrigerate until serving time.

For the green beans:
Oil for frying
1/2 lb green beans
1 cups flour
2 tsp tsp kosher salt
1/4 tsp baking powder
1/8 tsp chile powder
1 cups milk

Heat the oil to 375 degrees.

While the oil heats, combine the flour, salt, baking powder and chile powder. Whisk well to combine. Add the milk and whisk until smooth. Once the oil is heated, dip a few green beans in the batter and shake off the excess. Add the beans into the oil and fry for a few minutes, until the batter is golden. Remove the beans from the oil and onto a paper bag or paper towels to drain. Repeat with the remaining beans.

Serve deep-fried beans with basil aioli.

Yields 4 servings.

Rookie's Notes: When frying these, hold half of the bean in the oil until you can feel it float to the top. Then drop in rest of the bean you are holding. It will prevent the beans from going straight to the bottom and burning.

Also, don't be temped to load up the oil with too many beans. The more you add, the quicker the oil temperature will drop and you will get greasy fried food and not crisp fried food.

One last note, I added baking powder to the batter because I wanted a puffy, crispy batter. If that isn't your forte, don't add the baking powder.


HAVE A QUESTION ABOUT THIS RECIPE OR ANYTHING ELSE? Click here.

Wednesday, July 21, 2010

Classic Deviled Eggs

Two things that are all-American. Deviled eggs and this picture.


Blond-haired, blue-eyed little boy holding a baseball, running down a Slip 'n Slide with an American flag waving in the background. And no, none of this was set up. It's just how we spent our afternoon last week.

As I was making these deviled eggs, I was thinking about how weird they are. Refashioning the yolk, putting it back in and then eating it. Boiled eggs are weird enough as it is. As weird as they are, deviled eggs are the American backyard barbecue essential. Which by the way, America (starting to feel very Bernie Mac right now), what is the logic in making this for a backyard barbecue when mayo gets gross in the heat?


6 eggs
2 Tbsp mayonnaise
1 tsp dijon mustard
1 tsp dill relish
1/2 tsp kosher salt
A few grinds black pepper
1/4 tsp celery salt

In a medium pot, gently add the eggs. Cover with water and set over high heat. Bring to a boil, cover and remove from heat. Let sit for 30 minutes. Remove eggs from water and let them sit to cool. To speed up the process, refrigerate until cool enough to handle.

Once cool, gently peel the shell off the eggs. Cut the eggs in half and then carefully spoon out the firm yolk and add it to the medium bowl. Once all the eggs are cut and yolks are in the bowl, mash the yolks with a fork until they are broken down to fine crumbs. Add mayonnaise, dijon mustard, relish, salt, pepper and celery salt. With a rubber scraper, mix until smooth. Either with a piping bag or a spoon, evenly distribute the yolk mixture into the hollowed out egg whites. Serve immediately or cover and refrigerate until serving.

Yields 12 deviled eggs

Rookie's Notes: One problem I always run into with deviled eggs is that there never seems to be enough yolk mixture to put into the egg whites. Solution: Boil two extra eggs and use the yolks from those, just not the white.

If you want a good spin in a deviled egg, I had a stroke of genius last April. Avocado and cilantro deviled eggs. They are nearly perfect. Click here for the recipe.


HAVE A QUESTION ABOUT THIS RECIPE OR ANYTHING ELSE? Click here.

Friday, June 18, 2010

Bacon-wrapped Water Chestnuts

I love it when someone tells me about one of their favorite recipes and then the agrees to put together a guest post for me. That is what Sarah did. Sarah, who named her son Zealand. Such a cool name.

Sarah and Zealand

Awhile ago, Zealand's mom left a comment on a post talking about these bacon-wrapped water chestnuts. It's apparently a family specialty and it could be your families next specialty as well. Sarah, take it away lady.


When I married into the Hunt family, I struck recipe gold. This recipe is one of the many, many unique and delicious recipes from my husband's mother and grandmother's recipe gold mine. This recipe is a great tradition in our family for Thanksgiving and Christmas. But as good as they are, I have broken free and made them several times throughout the year, especially for dinner parties. My sister and brother-in-law have made a variation of this that is also very very delicious. Bacon-wrapped pineapple. Everything the same just pineapple in the middle instead of water chestnuts. Juicy!


3 8 oz cans whole water chestnuts, drained
2 lbs bacon
1 cup sugar
1 cup ketchup
3 Tbsp soy sauce

Set oven to 375 degrees.

Cut bacon in thirds and wrap around chestnuts. Secure with a toothpick. Set on a baking sheet and bake for 20-25 minutes.

While bacon is in the oven, combine sugar, ketchup and soy sauce in a medium sauce pan. Cook over medium heat until the sugar is dissolved, about 5 minutes. Remove from heat and set aside.

When the bacon is cooked through and crisp, drain the excess grease and pour the sauce over bacon chestnuts. Return to oven, reduce the heat to 350 degrees and bake for another 20 minutes. Remove from the baking sheet and transfer to a serving platter.


Sarah's Notes: This makes A LOT! Also, I use 1/2 brown sugar and 1/2 granulated sugar, or sometimes all brown sugar, but the recipe does call for just regular sugar.

Rookie's Notes: My graphic designer slave wanted me to tell you about this high fructose corn syrup free ketchup. Organicville's Ketchup. Click here for a link.

Wednesday, June 9, 2010

Ethan's Pizza Rolls

This recipe idea hit Ethan like a brick. Like woke him up in the middle of the night. He was hit by a brick in his sleep. Such a terrible way to get an idea. This was a brick telling him that an egg roll wrapper can house all sorts of delicious things. He didn't waste any time trying it out. And we enjoyed. And so did our neighbor who just happened to drop by at the exact right moment. Don't you wish you were my neighbor? In the words of the brilliant Usher, "Yeah".

The title of this recipe was up for debate. What is your vote?

Ethan's Pizza Rolls


Ethan's Mozzaroni Rolls


Italian Egg Rolls


I decided on Ethan's Pizza Rolls, cuz it's ma'blog and all. I can dictate what things are called, right? Ethan begged to differ. I said we should call these Ethan's Pizza Rolls. But he really liked Ethan's Mozzaroni Rolls, but that was a little too Rachael Ray for me. And Italian Egg Rolls was definitely a no-go. That just sounds gross. So Ethan's Pizza Rolls it is.

So what are these? An egg roll wrapper filled with marinara sauce, mozzarella cheese and ricotta cheese. And then some little gems of pepperoni and Italian sausage. All of those things are put in a pretty little pile in an egg roll wrapper and then deep-fried until crisp and golden. What about something to dip with? Anything fried needs a dip for a friend. Use whatever your and yours would prefer. Marinara, alfredo or a mix of both. We did a quick rose sauce. Marinara sauce mixed with heavy cream, garlic and Parmesan cheese.


1 lb bulk Italian sausage
1/2 lb pepperoni, cut into small pieces
2 cups shredded mozzarella cheese
8 oz ricotta cheese
A few cups marinara sauce (store-bought or homemade)
1 package egg roll wrappers
Vegetable oil for frying

In a large skillet over medium high heat, add sausage. Cook, breaking up with the back of a wooden spoon, until cooked through. Pour onto a paper-towel lined plate to drain. Set aside.

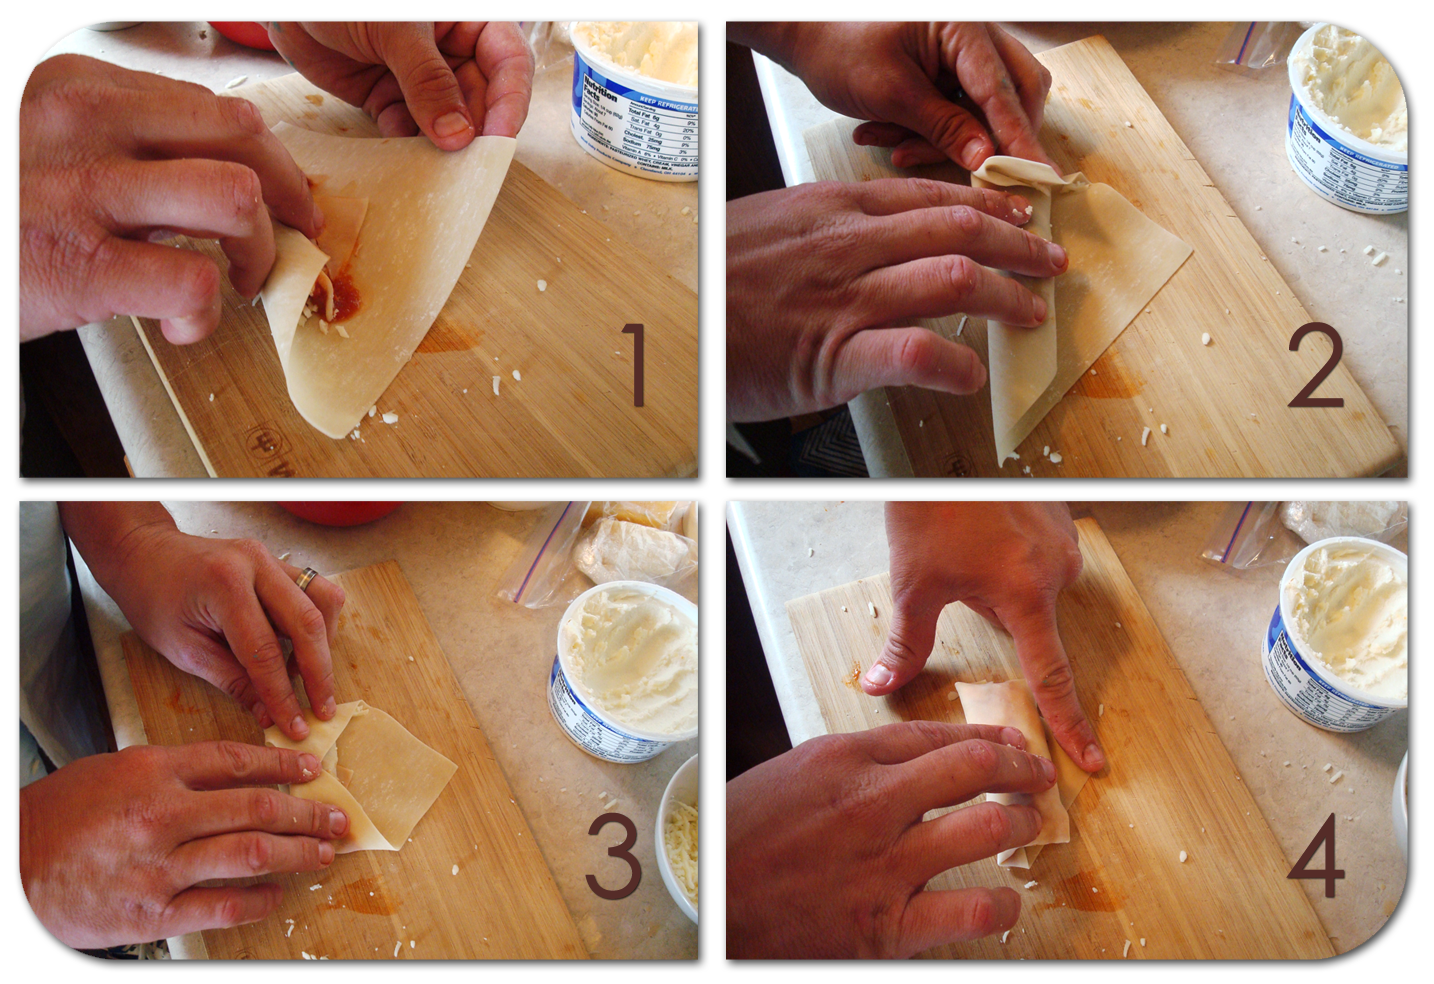
Fill a small bowl with water. On one egg roll wrapper, add a 2 tablespoons of mozzarella cheese and ricotta cheese. Add a few pieces of pepperoni and a tablespoon of cooked sausage. Add a tablespoon of marinara sauce over the top of everything. Roll the egg roll wrapper by pulling up the bottom corner, then folding over the two sides and then rolling over to the top. Dip your finger in the water and run it along the top corner and them fold the whole roll over and gently press to seal. Set aside and repeat until all of the sausage is gone.

Heat oil to 375 degrees. Fry each roll until golden brown, about 5 minutes. Drain on a paper-towel lined plate. Serve with marinara, alfredo or rose sauce for dipping.

Yields about 20 pizza rolls.

Rookie's Notes
: Here is how you roll up these little babies.


HAVE A QUESTION ABOUT THIS RECIPE OR ANYTHING ELSE? Click here.

Tuesday, March 23, 2010

Spicy Bean Dip

Here is the part where I lose a few readers because I used two cans of refried beans. And then here is the part where I gain a few new readers because I used two cans of refried beans. Which one are you? Either way, I don't care. Kidding. I care. But not really. But really-not.

It seems like recipes for bean dips only show up when there is some sporting event on TV. Like there were lots of bean dips floating around (go ahead and picture bean dips floating around in the sky. I did.) during the Superbowl. And tons of bean dips during the PBA Championships. What a nail-biter that was! I want bean dip for other things too. Like for lunch. Can I do that? I can.


This bean dip is better than yours because it has ground beef in it. And it has chipotle peppers in it too. It comes together in about 10 minutes and makes a lot. If you have leftovers, don't fret. Wrap up a spoonful into a tortilla and bake up some bean burritos. We did that and it was so very excellent.


1 lb ground beef
1 onion, diced
1 tsp kosher salt
A few grinds black pepper
1-2 chipotle peppers, depending on your taste, seeded and minced
3/4 tsp cumin
1/4 tsp chile powder
2 15 oz cans refried beans
1/2 cup sour cream
1 1/2 cups shredded cheddar cheese, divided
Chopped green onions, for garnish
Diced avocado, for garnish
Tortilla chips for dipping

Turn on broiler.

In a large skillet over medium high heat, add ground beef, onion, salt and pepper. Cook, breaking up the ground beef. Cook until beef is cooked through and the onion is translucent. Stir in chipotle pepper, cumin and chile powder. Add refried beans, sour cream and 1 cup cheddar cheese. Stir well to combine, until cheese is melted. Pour mixture in a 2 qt baking dish and sprinkle remaining 1/2 cup cheddar cheese on top. Put bean dip under the broiler for 5 minutes, or until the cheese is melted. Top with green onions and avocado. Serve with tortilla chips.

Rookie's Notes: When I initially tasted this, I thought it lacked salt. But when I started dipping chips, I realized it was perfect. The chips were salty and they added the right amount of salt. If I added more salt to the beans, it would have overly salty and not delicious.

If you want to make bean burritos with the leftovers, it's quite easy. Add about 1 cup of beans to a burrito-sized tortilla and fold it up to seal the edges. Bake the burritos, seam side down, at 400 degrees for 15 minutes. They are so delicious. I even texted Ethan to tell him how amazing I was. It was so good I just had to tell someone.

Friday, February 12, 2010

Curry-spiced Roasted Chickpeas

Here is a Jack snack. He was so anxious for these to come out of the oven. And he had to wait for awhile because they took over an hour. But that hour was crucial for a crunchy success. These are an ideal snack for your children or yourself. Chickpeas are a great source of protein. They contain a decent amount of fiber as well. When using this spice mix, you will find it a pleasure to load up on protein and fiber and so will your family.


2 15 oz cans chickpeas
3 tsp curry powder
1 tsp garam masala
3/4 tsp kosher salt
3/4 tsp ground ginger
1/2 tsp turmeric
1/4 tsp cinnamon
1/4 tsp allspice

Set oven to 325 degrees. Drain and rinse chickpeas well. Spread onto a towel in a single layer and let them dry for 10 minutes.

In a small bowl, combine all spices and mix well. Spray a baking sheet with non-stick spray and add dry chickpeas. Evenly sprinkle spice mixture over the chickpeas. Gently roll your hands over the chickpeas to evenly coat them with spices. Spread into a single layer and bake for 1 hour and 15 minutes, until chickpeas are smaller in size and crunchy. Let cool for 10 minutes and transfer to an airtight container.

Yields about 4 cups roasted chickpeas.

THIS WEEK HAS BEEN CONGENITAL HEART DEFECT AWARENESS WEEK. IN HONOR OF THAT, MY COUSIN LINDSAY HAS BEEN WRITING HER DAUGHTER MARIN'S STORY AND HAS UNPRIVATIZED HER BLOG SO YOU CAN READ IT. PLEASE DO. CLICK HERE FOR A LINK.

Monday, November 30, 2009

Holiday Veggie Dip

Thanksgiving was as it should be. Food, family and full tummies. My Thanksgiving contributions were the mashed potatoes, a chocolate truffle pie and the relish trays. The potatoes were atomic. I did red skin potatoes and left them unpeeled and the peels added great texture. I kept the potatoes relatively simple. They are the binder for the meal and bring everything together, so I wanted a plain canvas. I did heavy cream, minced garlic, kosher salt, ground pepper and loads of butter. And as planned, they were a canvas. A canvas swathed and splattered in gravy, stuffing and turkey.

Van had a jolly Thanksgiving. He is a skinny little string bean, which is odd because he can eat and eat and eat and eat. And eat. He snacks all day and on whatever I give him. So of course, he was happy as could be on Thanksgiving. He was given food all day. Oh, and he also learned how to push the stepping stool over to the counter and climb up. I wish I could let him stay on the counter. He looks so proud and pleased when he gets up there.

Like I said before, Jack and Ethan were in California. Ethan's Thanksgiving was spent catering dinner for 20 with all the fixings. The man can make the greatest gravy and I am sad I missed it. Jack spent the day with cousins and then ended it with a viewing of "Christmas Carol" at the El Capitan in Hollywood.

It feels good to get into the holiday season. Both my husband and I were blessed to grow up in fun, entertaining and happy families. The holiday season brings lots of quality family time. I can't wait to go down to Southern California for Christmas and enjoy Ethan's family. Have I ever told you that Ethan grew up in a family of 11 kids? I know, 11. Crazy.


Here is the recipe for the dip I used on our relish trays this year and years past. I don't seem to make this any other time of the year besides Thanksgiving and Christmas. But of course, it could go for whenever. There isn't anything too complicated in this and it's easy to throw together. If you remember to, make this the night before so the flavors have a chance to get better acquainted.


1 cup mayonnaise
1/2 cup sour cream
1 tsp Worcestershire sauce
1 Tbsp onion powder
1 tsp Italian seasoning blend
1/4 tsp kosher salt
1/8 tsp curry powder
1/2 lemon, juiced
Small handful chopped fresh parsley

Combine all ingredients in a medium bowl and mix well. Refrigerate for at least 30 minutes, so the flavors can develop. Serve with cut vegetables.

Yields 1 1/2 cups of dip.

Rookie's Notes: If potato chips are your thang, go ahead and dip with those too.


Do you still have leftover cranberry sauce? Make a cranberry milkshake. A big scoop of cranberry sauce, a few scoops of vanilla ice cream and a splash of milk. It is so satisfying.

Thursday, September 24, 2009

Ethan's Grilled Artichokes with Chipotle Dipping Sauce


Have I ever told you about my husband? Yeah, you know he is funny and a good dad, but the poor guy has it harder than most. He has a rare foot deformity that causes him a lot of pain. It's gotten worse and worse over the years and now he has had to quit his favorite past time- golf. And it's a real crime because in his prime, he was a scratch golfer. Eventually he will be in a wheelchair and the thought of that is heartbreaking. But we have cried the necessary tears over it and we are pressing forward. Fresh courage take, right?


While he might not be able to walk much, he can still cook like the dickens. Here is one of his specialties. I swear they taste better every time he makes them.


When I pulled these off the grill, Ethan asked how they looked. I told him, "Dead sexy".

For the artichokes:
6 artichokes
1 Tbsp garlic salt
2 Tbsp olive oil
1/2 cup soy sauce
1/2 cup olive oil
1/4 cup red wine vinegar
2 Tbsp Worcestershire sauce
1 Tbsp sesame oil
1 tsp Tabasco
4 garlic cloves, minced
1/2 tsp kosher salt
A few grinds ground pepper

Put the artichokes in a large pot. Cover with water and sprinkle on the garlic salt and add the 2 Tbsp olive oil. Turn heat to high and bring to a boil. Boil for 45 minutes, until a middle leaf pulls of easily. Drain water and set artichokes aside until cool enough to handle.

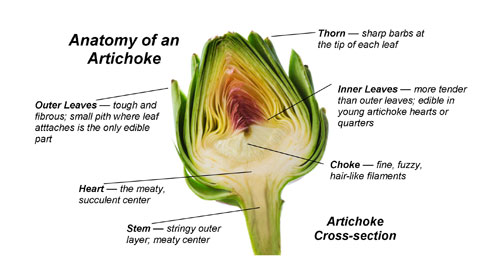
Once cooled, cut artichokes in half lengthwise. Scoop out the choke (click here for a diagram of an artichoke to know what the choke is). Put into a large bowl and set aside. In a medium bowl, combine the 1/2 cup olive oil, soy sauce, red wine vinegar, Worcestershire, sesame oil, Tabasco, garlic, salt and pepper. Whisk until well combined. Pour over artichokes and let marinate for up to an hour.

Set grill to medium high. Grill artichoke halves on each side for 3 minutes. Serve with chipotle dipping sauce.

For the sauce:
1 cup mayonnaise
1 Tbsp lemon juice
3 chipotle peppers, seeded and minced
2 garlic cloves, minced

In a small bowl, whisk all ingredients together. Cover and keep refrigerated until serving time.

Monday, August 31, 2009

Tomato Basil Bruschetta

This was made for my haircutting sister. Caitlyn does my hair and I like to compensate her in food. Like chocolate cookies and bruschetta. She did my hair last week and I do have to say it is pretty rad. I keep my locks long and dark brown. Ethan likes it that way. But because I felt the sudden need to bust out of the mother-of-two mold, I had Caitlyn add midnight blue streaks through out my hair. They are subtle and you can't see them on top, only underneath. So it's a little "Hey, I am a mom, but would like to think I am living on the edge" type of color job. I just needed something that wasn't an A-line and that wasn't what Sister So-And-So was going to have at church. And sure enough, I get all sorts of feisty looks from people. But Son One LOVES it and so does my husband and that is all that matters.


It took us three tries to get the right blue. The first two were at the salon and the third was at home. To wash the third blue out, I just took a shower. And wow, what a number that did. I was blue and so was my shower. I yelled for Ethan to come see and he said, as blue dripped down my bosoms, "You look like you murdered a smurf". And boy did I.


This is an essential bruschetta recipe. This is a lot like the guacamole in that is it very simple, fresh foods producing great flavor.


1 loaf French bread or baguette
6 medium tomatoes, chopped
20 basil leaves, minced
1 tsp kosher salt
1 tsp balsamic vinegar
3 garlic cloves, minced
2 Tbsp good olive oil, plus more for brushing on bread (by good I mean the nicest extra virgin olive oil your store has. And make sure it's extra virgin. We don't want any slutty olive oil around here.)

Turn on the broiler. Slice the bread into 15-20 slices, on an angle. Set the bread slices on a baking sheet. Pour a small amount of olive oil in a bowl and brush oil onto the bread slices with a basting brush. Put under the broiler for 2-3 minutes, until lightly browned. Remove from oven and cool.

In a medium bowl, combine the tomatoes, basil, kosher salt, balsamic vinegar, garlic and 2 Tbsp olive oil. Stir gently until combined.

Spoon mixture onto bread slices. Finish with a light sprinkling of kosher salt.

Served with this: This was lunch. We wolfed it down without a thought as to adding something else to our meal. But it could be an appetizer or a side dish.

Tuesday, August 25, 2009

Chipotle Peach Salsa

The perfect combination of sweet and spicy. The chiles add the spicy kick and the peaches calm down the heat. Since the chiles are seeded, the heat is tamed and adds just the right amount of zing in the back of your throat.

I have a recipe simmering in my head for salmon tacos. Sooner than later it will appear on the blog. I am thinking that this will be the salsa that accompanies them.


Open wide!

5 medium tomatoes, chopped
1 peach, peeled and diced
3/4 cup diced onion (red, yellow or white- whatever you have on hand)
1 lime, juiced
1/4 cup chopped cilantro
1 Serrano chile, seeded and minced
1 Tbsp minced Anaheim chile
2 chipotle chiles in adobo, seeded and minced
1 tsp adobo sauce (from the can of chipotles in adobo)
1 garlic clove, minced
1/2 tsp kosher salt

In a medium bowl, combine all ingredients. Stir well to combine. Pour salsa into the bowl of a food processor. Pulse 10-12 times. Serve immediately or cover and refrigerate.

Wednesday, August 12, 2009

Ethan's Stuffed Mushrooms

Here is the husband. These little mushrooms are apparently his specialty. I wouldn't know, I'm not a shroom fan. But I trust Ethan. He has yet to make crappy food. He has a few recipes that have graced the index of Rookie Cookie. Things like mac and cheese and creamed corn.

When Ethan made these, we got into a bit of a tiff. First, we fought over whether mushrooms should be washed under water or if they should be brushed off with a towel. Then we fought about when to take them out of the oven. I did play the blog card and said, "I'm the one with a blog. I know more than you and I have a blog to prove it." He then played the catering card and retorted, "I have been a caterer all of my life. I know more about food than you ever have." It ended up that Ethan got his way on both arguments. Lame. Yeah, we fight like children. But it's all in the name of nookie.


20 medium whole mushrooms
1 cup shredded mozzarella cheese
1/3 cup fresh shredded Parmesan
4 oz cream cheese
4 garlic cloves, minced
1/2 cup plain bread crumbs
2 tsp kosher salt
A few grinds ground pepper
1/4 cup olive oil

Set oven to 400 degrees.

Remove stems from mushrooms. Finely mince stems and add to a medium bowl. Add mozzarella, Parmesan, cream cheese, garlic, bread crumbs, salt, pepper and olive oil. Mix well using a rubber scraper. Once combine, spoon a small amount of cheese mixture into mushroom caps. Sprinkle a small amount of mozzarella cheese on top of each mushroom. Lightly drizzle olive oil over all the mushrooms.

Bake stuffed mushrooms for 15-20 minutes, or until cheese is lightly browned.

Served with these: grilled pork chops, steamed veggies and green salad. Pluot upside-down cake.

Wednesday, July 29, 2009

Grilled Garlic Bread

My little Son One likes to help in the kitchen sometimes, but it is always things he just can't do.

"Mom, let me see your knife. I will cut those onions for you!"

"I will pour the oil in the pan for you."

"I can turn on the grill for you."

No, you actually can't. But you can put the silverware away, get the napkins out and go wash your hands. When Jack asks to do things that are too mature for him to do, my answer is, "Not until you are as tall as Dad". That goes for most of the things he asks for, such as long kisses from girls, having kids, getting married, owning a gun, buying a train, flying a plane and grilling.


1/2 cup butter, softened
1 Tbsp dried basil
1 tsp dried rosemary
1/2 tsp kosher salt
4 cloves garlic, minced
1 loaf French bread, cut into 14 slices

Heat grill to medium high

In a small bowl, combine the butter, basil, rosemary, salt and garlic. Mix with a rubber scraper. Spread butter onto one side of the bread slices. Grill bread slices for 1-2 minutes on each side.

Tuesday, June 23, 2009

Edamame Hummus

I have often had people ask how I post at the same time everyday. 6:00 am everyday, I get up and push "publish". Actually, I schedule everything, sometimes weeks in advance. Like this post, I wrote this a while ago.

I spend a lot of evenings sitting with my laptop, tapping away about a tsp of this and a cup of that. At this moment, I am sitting with Ethan as he crunches away on his sunflower seeds. He is totally addicted to those. Zotes are his favorite. We are watching the second season of "Lost". And all I can think of is how freaking twisted this show is. I can't even think about this yummy hummus. I cannot think of how great is tastes with some tortillas. Wait, yes I can. It was delightful. I made this and then brought it to the park so that I could snack while Jack went down slides and threw bark at other kids. Van likes hummus, but only when I put it on a spoon and feed it to him. Is it okay for me to give my baby an occasional spoonful of hummus? Well, I do it because he likes it. And I love doing things that Van likes because it makes him smile and his smile is infectious.


1 lb frozen shelled edamame, about 3 cups
1/3 cup water
1/2 cup tahini paste
1 lemon, zested and juiced
3 garlic cloves, peeled and smashed
2 tsp kosher salt
1/2 tsp ground cumin
1/2 tsp ground coriander
4 Tbsp extra-virgin olive oil
A small handful of chopped fresh parsley

In a medium pot of salted water set on high, boil the edamame. Cook until tender, about 5 minutes. Drain into a colander and run under cold water until no longer hot and drain.

Pour edamame in the bowl of a food processor. Add the water, tahini, lemon juice and zest, garlic, salt, cumin, coriander and olive oil. Process until smooth. If it appears thick, add a little more water while the machine is on.

Transfer hummus to a shallow dish. Drizzle on a small amount of olive oil and sprinkle with fresh parsley. Serve with vegetables for dipping or pita bread.

Tuesday, May 19, 2009

Homemade Granola

I always feel a little uppity when I tag on the phrase "homemade" to a recipe. I feel the same way about "organic". With this recipe and the other ones I have titled "homemade", I did so because this is something I would normally buy. So it's granola, but I made it at home. Glad I clarified that. I don't want to come off as a yuppie.

The word granola conjures up certain memories in my brain. Memories of my once-mean older sister Megan. She used to be quite rotten to me (like most older sisters are) and then the Good Lord told her to grow up and be grateful for me. I do make good food and I won't share with someone who is mean. Anyways, when I was in my awkward early teen years, Megan used to be mean and call me a granola. Apparently, I was weird, had no sense of normal clothing and didn't know how to wear makeup. I am not sure if "granola" was the right term. Maybe just painfully uncouth.


This is more of a clusters-type of granola. The oat flour helps hold the clusters together. Clusters are good because they provide for easy snacking.

This recipe provides for a pretty self-designed granola. You add whatever fruits, nuts and seeds you want. For this particular batch, I added sunflower seeds, hazelnuts, almonds, raisins and dried cranberries. But the possibilities are endless. Some ideas:

Nuts you could use:
Pecans, walnuts, almonds, hazelnuts, pine nuts, cashews, Brazil nuts, peanuts, macadamia nuts, pistachios.

Seeds you could use:
Sunflower, pumpkin, flax seeds.

Dried fruit you could use:
Raisins, cranberries, blueberries, raspberries, cherries, strawberries, mangoes, pineapple, apples, bananas, prunes, dates, peaches, apricots.

With the dried fruit, make sure you chop it up if needed.


5 cups quick oats
2 Tbsp ground flax seed
3 cups seeds or chopped nuts
2 tsp cinnamon
1/2 tsp cardamom
1/2 tsp mace
1 tsp nutmeg
1 cup brown sugar
1/2 cup butter
1/3 cup water
1/2 tsp kosher salt
2 tsp pure vanilla extract
Dried fruit, however much you prefer

Set the oven to 300 degrees.

In the bowl of a food processor or in a blender, add half the oats (2 1/2 cups). Grind, making oat flour. In a large mixing bowl, add the oat flour, quick oats, seeds and nuts, cinnamon, cardamom, mace and nutmeg. Stir well to combine.

In a medium saucepan over high heat, add the brown sugar, butter and water. Stir until the butter is melted and the mixture bubbles. Remove from heat and add the salt and vanilla. Pour brown sugar mixture over the oat mixture and stir to combine. If the mixture seems a little bit dry, you can add a little more water.

On two greased cookie sheets, spread the oat mixture. Using your fingers, make small mounds of the oat mixture all over the cookie sheet. Bake for 30 minutes. Remove cookie sheet from the oven. Using a spatula, break up the mounds into bite-size clusters. Put the sheets back in the oven, but be sure they have switched places (the one that was on the bottom is now on top). Bake for 45 for minutes, stopping every 15 minutes to toss the granola and alternate the cookie sheets.

Once baked, remove from oven and let cool on the cookie sheets. Once cooled, add however much dried fruit you want. Store granola in an air-tight container. Serve over yogurt, sprinkle over muffins before baking, eat with cold milk, stir into oatmeal or just eat it by the handful.

Credit for the gist of this recipe goes to The Traveler's Lunchbox

Monday, April 6, 2009

Avocado and Cilantro Deviled Eggs

Easter is wonderful. It is a celebration of life, both in nature and in heaven. We celebrate the resurrection of Jesus Christ and we celebrate the arrival of Spring. Like most holidays, there is a lot of tradition and ritual, one of those being colored hard-boiled eggs.

As a child, we colored eggs every year. It was always fun to crowd around the cups of dye and fight over who got the pink or the purple (family of 6 girls and no boys). Once Easter morning came, the eggs had been hidden and we gleefully went to find them. When the egg hunt was over, we were all left with a basket of hard-boiled eggs. Yipee skippy. What does a kid want to do with a basket of hard-boiled eggs? Probably not too much.

Over the next three days, we will embark on a recipe series of what we can do with these eggs. Don't let them become subject to your children as they eat the whites and toss the yolks (because that is what we used to do). I have a few recipes that should be able to help you make those eggs useful.


Recipe number one: Avocado and Cilantro Deviled Eggs. A twist on a classic. They are easy to put together, especially when you already have the eggs hard-boiled. And good news on this one- quite figure friendly. No mayo or sour cream. And you get a boost from the avocado.


6 hard-boiled eggs, peeled
1 avocado
1/2 tsp lime juice
1 Tbsp finely minced red onion
1 Tbsp finely chopped cilantro
A few dashes of Tabasco sauce (I did about 7. I'm spicy that way.)
A few grinds of pepper
1/2 tsp kosher salt

Cut eggs in half lengthwise. Carefully scoop out the yolks and put into a medium bowl. Put egg halves on to a platter and put into the fridge.

With a fork, crumble up the egg yolks. Cut avocado in half and remove the pit. Scoop out the avocado flesh and add it to the egg yolks. With a spoon, mix well, until the yolks and avocado are creamy. Add lime juice and mix well. Add red onion, cilantro, Tabasco, pepper and salt. Mix well to combine.

Remove egg halves from the fridge. Using a small cookie scoop, scoop avocado yolk mixture into the egg halves. Garnish with a single cilantro leaf. Serve immediately, or before the avocado browns.

Tuesday, December 2, 2008

Chewy Cranberry and Almond Granola Bars

I have a very faithful taste tester, my dad, Jack Sr. My dad is willing to eat whatever I put in front of him. I have changed his life by introducing him to cilantro. He loves the stuff. He gets a real kick out me rarely making the same thing more than once. He's always asking me if something is worthy of making it twice. These are. I can imagine having these around for snacks when I am walking out the door. And my dad can imagine that too, because he asked me to keep a steady supply of these around.


2 cups quick rolled oats, divided
1 cup sugar, divided
2 Tbsp light corn syrup
2 Tbsp butter, melted
1/2 tsp salt
1/4 tsp cinnamon
1 cup sliced almonds
1 cup dried cranberries
1 tsp pure vanilla extract
1/4 cup melted butter or vegetable oil
1/4 cup honey, maple syrup or corn syrup
1 Tbsp water

Set the oven to 350°F. Lightly grease a 9" x 13" pan. Line with a piece of parchment paper, with a generous overhang. Lightly spray the parchment with non-stick spray.

In the bowl of a food processor, add ½ cup quick oats. Pulse until finely ground. Set aside.

In a small bowl, combine ¾ cup sugar, light corn syrup and melted butter. Set aside.

Stir together the remaining 1½ cups of oats, ground oats, sugar mixture, remaining ¼ cup sugar, salt, cinnamon, almonds and cranberries.

In a separate bowl, whisk together the vanilla, melted butter or oil, syrup or honey, and water.

Toss the wet ingredients with the dry until the mixture is evenly crumbly. Spread in the prepared pan, shaking the pan to evenly cover the bottom and patting down gently

Bake the bars for 25 to 30 minutes, until they're golden brown around the edges. Remove them from the oven, loosen the edges, and cool completely.

Using the parchment over hang, remove the granola. Place on a cutting board and cut into bars. Wrap individually in clean parchment paper.

Rookie's Notes: Use whatever fruit or nuts you want. Raisins, apricots, blueberries, mangoes, chocolate chips, coconut, orange zest, sunflower seeds, walnuts, pine nuts, peanuts, pecans. Whatever you have in your cupboard.

Wednesday, August 27, 2008

Traditional Hummus

Ethan and I were married in the Los Angeles LDS Temple. After we got married, we stayed in California and we plan on doing just that. Once the wedding chaos subsided, I had to come down from my cloud and get a job. So I worked at a car dealership for 2 years before Ethan and I started a family.

During my time at the dealership, I met a lot of people from all over the world. Car dealerships seem to be quite diverse. We used to have monthly pot lucks and everyone from the sales manager to the lot porters brought something to share. I loved these potlucks because I got to try so many new foods from all over the place. Jose the service porter would have his mom make pasole. Jake in finance would bring loads of baklava. Lynton in sales would bring something wonderful wrapped in grape leaves. And Sandra in the back office would load us all up on hummus. It was then that I fell in love with hummus.

And I think you should too.


2 (15 oz) cans chickpeas/garbonzo beans
1/2 tsp salt
2 garlic cloves
1/2 cup tahini (sesame seed paste)
1/4 - 1/2 cup lemon juice, depending on your taste
olive oil, parsley, paprika or cumin for serving

Rinse the chickpeas, then place in a saucepan with water to cover by one inch. Put your hands in the pot and gently rub the chickpeas against each other. Place saucepan on the stove and bring to a boil and simmer until chickpeas are very soft: test a chickpea by squeezing it between your fingers, it should smash easily, this could take between 5 and 20 minutes. Remove from the heat, skim off any chickpea skins that have floated to the surface and discard them.

Place the garlic and salt in a food processor and pulse to chop. Add the tahini and lemon juice and process until the mixture is lightened in color. Use a slotted spoon to transfer the chickpeas to the processor (don't discard the cooking liquid) and process until very smooth. Thin the hummus to the desired consistency with the reserved cooking liquid. Taste and adjust seasoning with lemon juice and salt.

Spread hummus in a shallow bowl, drizzle with olive oil and sprinkle with spices if desired.

Rookie's Notes: I recently read a recipe online for hummus and they said that tahini is toasted sesame oil. Oh how far off that is! Those two things are totally different ingredients with different flavors. Make sure you are using tahini and not sesame oil.

Wednesday, August 6, 2008

Caramel Popcorn

I made LOADS of this stuff last Christmas. I think it was something like 13 batches. I thought my microwave was going to fizzle out on me for sure. But it didn’t and neighbors and friends enjoyed caramel popcorn.

When I went on my rounds to drop off my bags of golden goodness, one stop included the Swift Family. I walked up the steps and heard what sounded like children being abused. Yelling, screaming, banging, dog barking. For sure something wasn’t right. I hesitantly knocked on the door and the beatings stopped. The door opened and a little blond 4 year old, who doesn’t favor “R’s”, said, “We are having a wumble!” Sure enough, up to the door staggers the poor dad who had obviously been the subject of the abuse. Sweaty, tired and covered in dog hair, he thanked me for my offerings, gave me a plate of their holiday sweets, and then got back to being the victim of his 4 year old and 7 year old.

And from what I heard later, the popcorn became fuel and the “wumble” kept on.


1 cup packed golden brown sugar
1/4 cup light corn syrup
1/2 tsp salt
4 Tbsp unsalted butter
1 tsp vanilla extract
1/2 tsp baking soda
8 cups popped unflavored popcorn

In a large, glass, measuring cup, combine the sugar, syrup, salt, butter, and vanilla. Microwave on high for 1 minute. Stir and cook for 2 minutes. Add the baking soda and stir well (mixture will foam).

Pour the popcorn into a large brown paper bag (think Trader Joe's. I know a lot of people have those). Pour the syrup into the bag and stir to coat. Turn the bag under to close and microwave on high for 1 minute.

Transfer the caramel corn mixture to a baking sheet lined with waxed paper to cool.

Rookie’s Notes: For the popcorn, I use a microwave popcorn. One bag is just enough. And if you don’t have plain microwave popcorn, no biggie. I used buttered with this batch and it makes it that much more rich and buttery.

Monday, July 28, 2008

Onion Rings


Here is the delicious request from Jessica! I have known Jessica for as long as I can remember. She always lived close and went to the same schools as me. She is a few years younger than me, but I was good friends with her older cousin. Unfortunately, I was incredibly rude to her cousin when I was younger and I did some very rude and inconsiderate things to her over the years. Now looking back, I regret all of those things so much. So Jessica, could you pass it on to Stef that I know I was a jerk?

Hope that wasn't awkward. Kind of like a "My Name is Earl" type of thing, so just go with it. Anyways, newlywed Jessica and her honey have been having a hard time getting onion rings right. Hopefully this recipe proves to be successful. Good luck and let me know how it goes!


1 large onion
2 cups buttermilk
2 cups flour
1 scant Tbsp salt
Ground black pepper
1/4 to 1/2 tsp cayenne pepper
Canola Oil

Slice onion very thin. Place in a baking dish and cover with buttermilk for at least one hour.

Heat oil to 375 degrees. Combine dry ingredients and set aside.

With tongs, toss a few rings in to the flour mixture. Tap off the excess, and plunge into the hot oil. Fry for a few minutes and remove as soon as golden brown. Repeat until onions are gone.

Rookie’s Notes: These are more of a dredged onion ring as opposed to a battered onion ring. They will be crispier than battered onion rings. For a not-so-crispy onion ring, slice the onion in thicker slices.

When it comes to the frying part, watch your temperature closely. The more rings you put in the oil, the lower the temperature is going to get. It will take longer for the rings to cook and they will get greasy. So I suggest that between batches, let the oil come back up to temperature. On average, the temperature would go down to 340 degrees. It would take a few minutes to get back up to temperature after a batch, but it was so worth the wait.

Credit for this recipe goes to Ree at Pioneer Woman Cooks.